
The first project was to make a sewing basket for Evangeline. You could use any thread you want but I started with some vintage silk thread that belonged to my great-grandmother. It's been in a cigar tin since about 1920 and although I would never use it for actual sewing projects, I think using a little of it for EG is a perfect way for me to enjoy seeing it every day. In this pic you can see the small spools that I bought in the wood section at Michael's ($3.99 for the bag), and the thread I am using:

After I wound the thread on the spools I rubbed a dab of Aileen's clear tacky glue on the end of the thread to seal it up. I put some material scraps, the pin cushion from Tonner's Anne Harper, and the spools of thread into the picnic basket that came with Tonner's Miss Gulch and voila the sewing basket:

Then I decided her vanity was looking a little bare so it was time to make some dresser top jars and bottles. To make these I started with mini bottles found in the scrapbook section of Michaels:

I didn't want all of the bottles to be corked so to give some of them a more elegant appearance I used wire clippers to remove the shanks off the back of some vintage buttons and then glued the buttons to the top of the bottles after I had filled them with miniature white pom-poms (to resemble cotton balls) and baking soda (to resemble talcum powder or both salts). You can see the finished jars in the photo at the end.
To make a water carafe I used a small crystal door knob or drawer pull (I believe these are from the Tim Holtz scrapbooking line, found at Michael's.) I unscrewed the base, flipped it over, and glued a faceted blue rhinestone into the opening using Aileen's clear tacky glue. Here is a before and after, the drawer pull on the left, the water carafe on the right:

I also made a sherry decanter using the same technique but a different faceted rhinestone. Here is a pic of my sherry decanter, next to Evangeline's sherry decanter:

To make perfume bottles I inserted a small lightbulb into the hole of an octagonal bead. This pic shows only the "before", you will see the finished bottle a few pics down:

Next I wanted to make some other things you might find on a vanity table. These vintage game pieces were transformed..

into...

from left to right: a perfume bottle, a tooth powder tin (In the early 19th century toothpaste was bought as a powder, not as a finished paste), a talcum powder/body powder container, and a powder puff. I spray painted the game pieces either gold or white for a base and glued vintage buttons (with the shanks cut off) to the top of the two on the right. I used the following Dover clip art books to make authentic vintage labels for the tooth powder tin and the talcum powder:

These CD roms with clip art are very easy to use. You save the images as high-res jpgs to your desk top. I insert them into powerpoint where I am able to manipulate them down to the correct size without any distortion of the image. You can't see it in my pic but in person you can actually see the writing and the pictures on the labels.
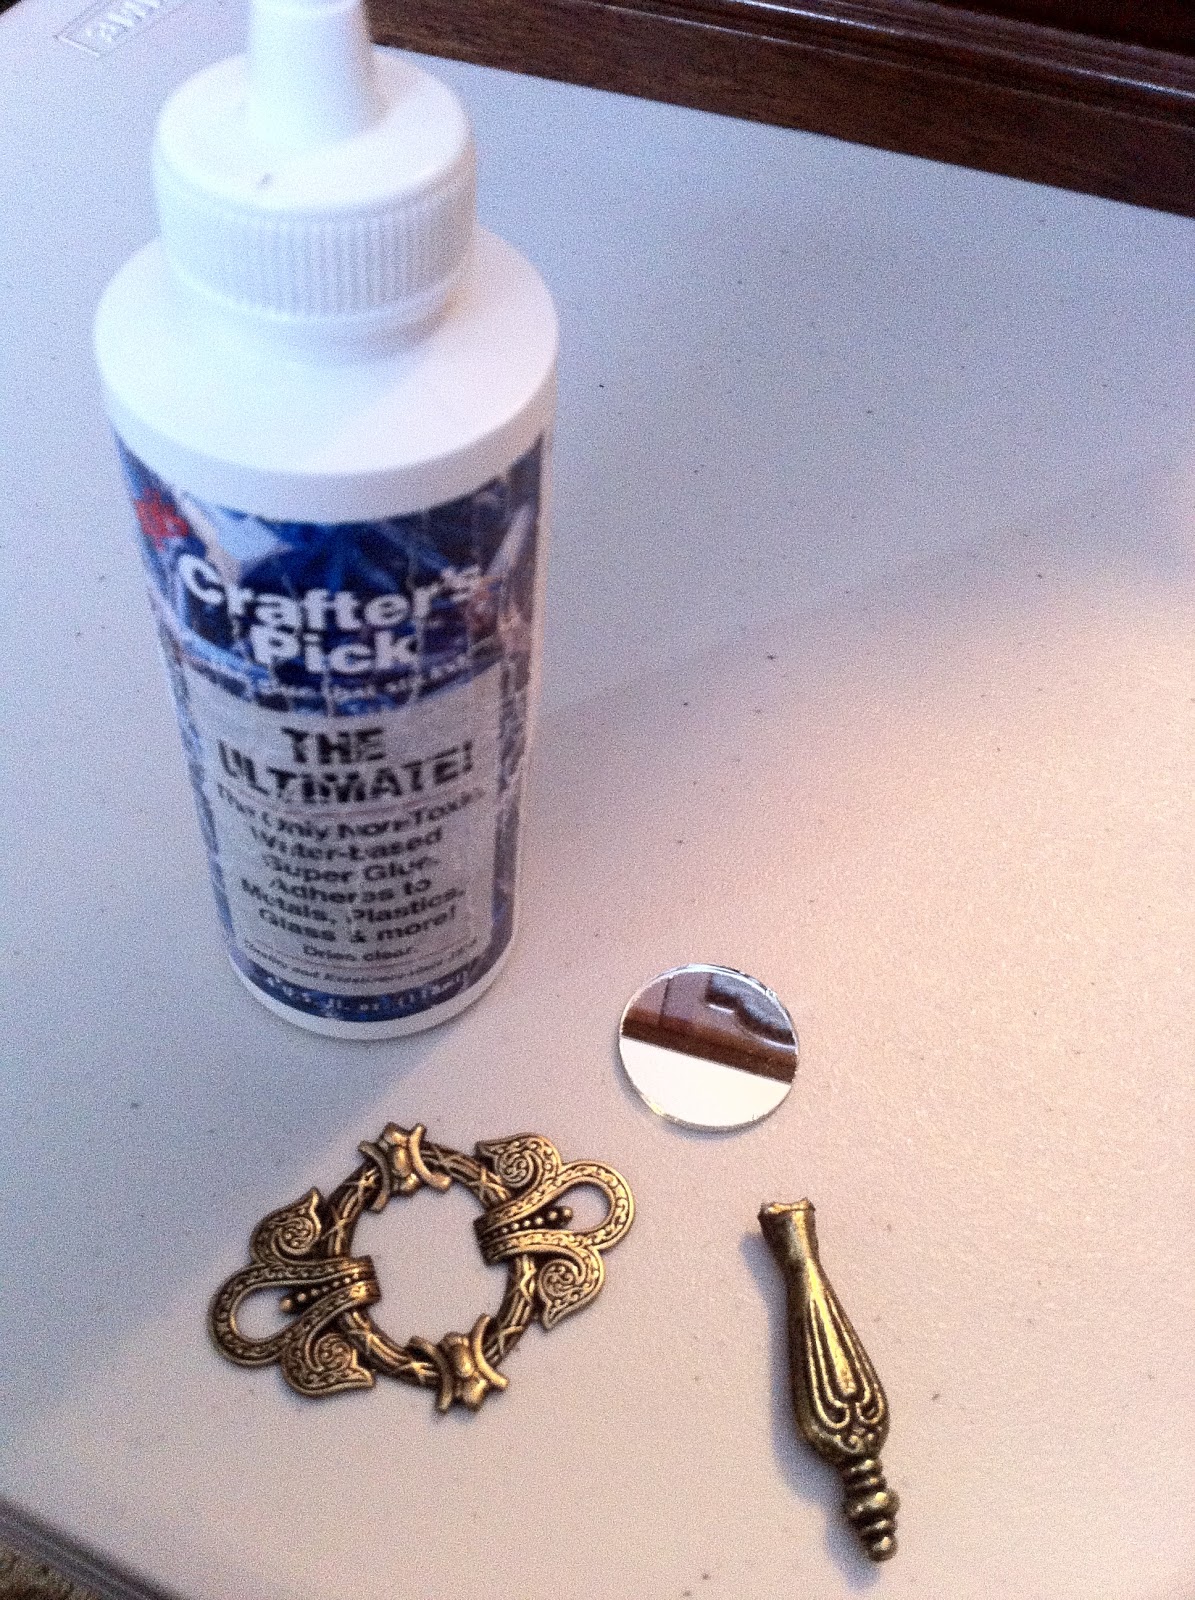
Then I figured Evangeline needed a hand mirror. I had a recycled drawer pull to use as the handle (it was a dangling drawer pull), a small metal frame from B'sues Boutique (see link above) and a small mirror from a bag of mirrors bought at Michael's. I used The Ultimate glue because it works well on metal to metal bonding. You do need to let it dry overnight before touching and it takes a few days to set completely but it sure beats welding!

Here is a look at the finished vanity top, and by the way, I made the picture of Mortimer by dropping a jpg of him from the WI site into powerpoint and shrinking it down:

That's all for now. I'm still trying to decide if my next diorama will be the drawing room of Dreary of Dreary Manor or the drawing room a Barkley Manor.

into...

from left to right: a perfume bottle, a tooth powder tin (In the early 19th century toothpaste was bought as a powder, not as a finished paste), a talcum powder/body powder container, and a powder puff. I spray painted the game pieces either gold or white for a base and glued vintage buttons (with the shanks cut off) to the top of the two on the right. I used the following Dover clip art books to make authentic vintage labels for the tooth powder tin and the talcum powder:

These CD roms with clip art are very easy to use. You save the images as high-res jpgs to your desk top. I insert them into powerpoint where I am able to manipulate them down to the correct size without any distortion of the image. You can't see it in my pic but in person you can actually see the writing and the pictures on the labels.
Then I figured Evangeline needed a hand mirror. I had a recycled drawer pull to use as the handle (it was a dangling drawer pull), a small metal frame from B'sues Boutique (see link above) and a small mirror from a bag of mirrors bought at Michael's. I used The Ultimate glue because it works well on metal to metal bonding. You do need to let it dry overnight before touching and it takes a few days to set completely but it sure beats welding!
Here is a look at the finished vanity top, and by the way, I made the picture of Mortimer by dropping a jpg of him from the WI site into powerpoint and shrinking it down:

That's all for now. I'm still trying to decide if my next diorama will be the drawing room of Dreary of Dreary Manor or the drawing room a Barkley Manor.
No comments:
Post a Comment