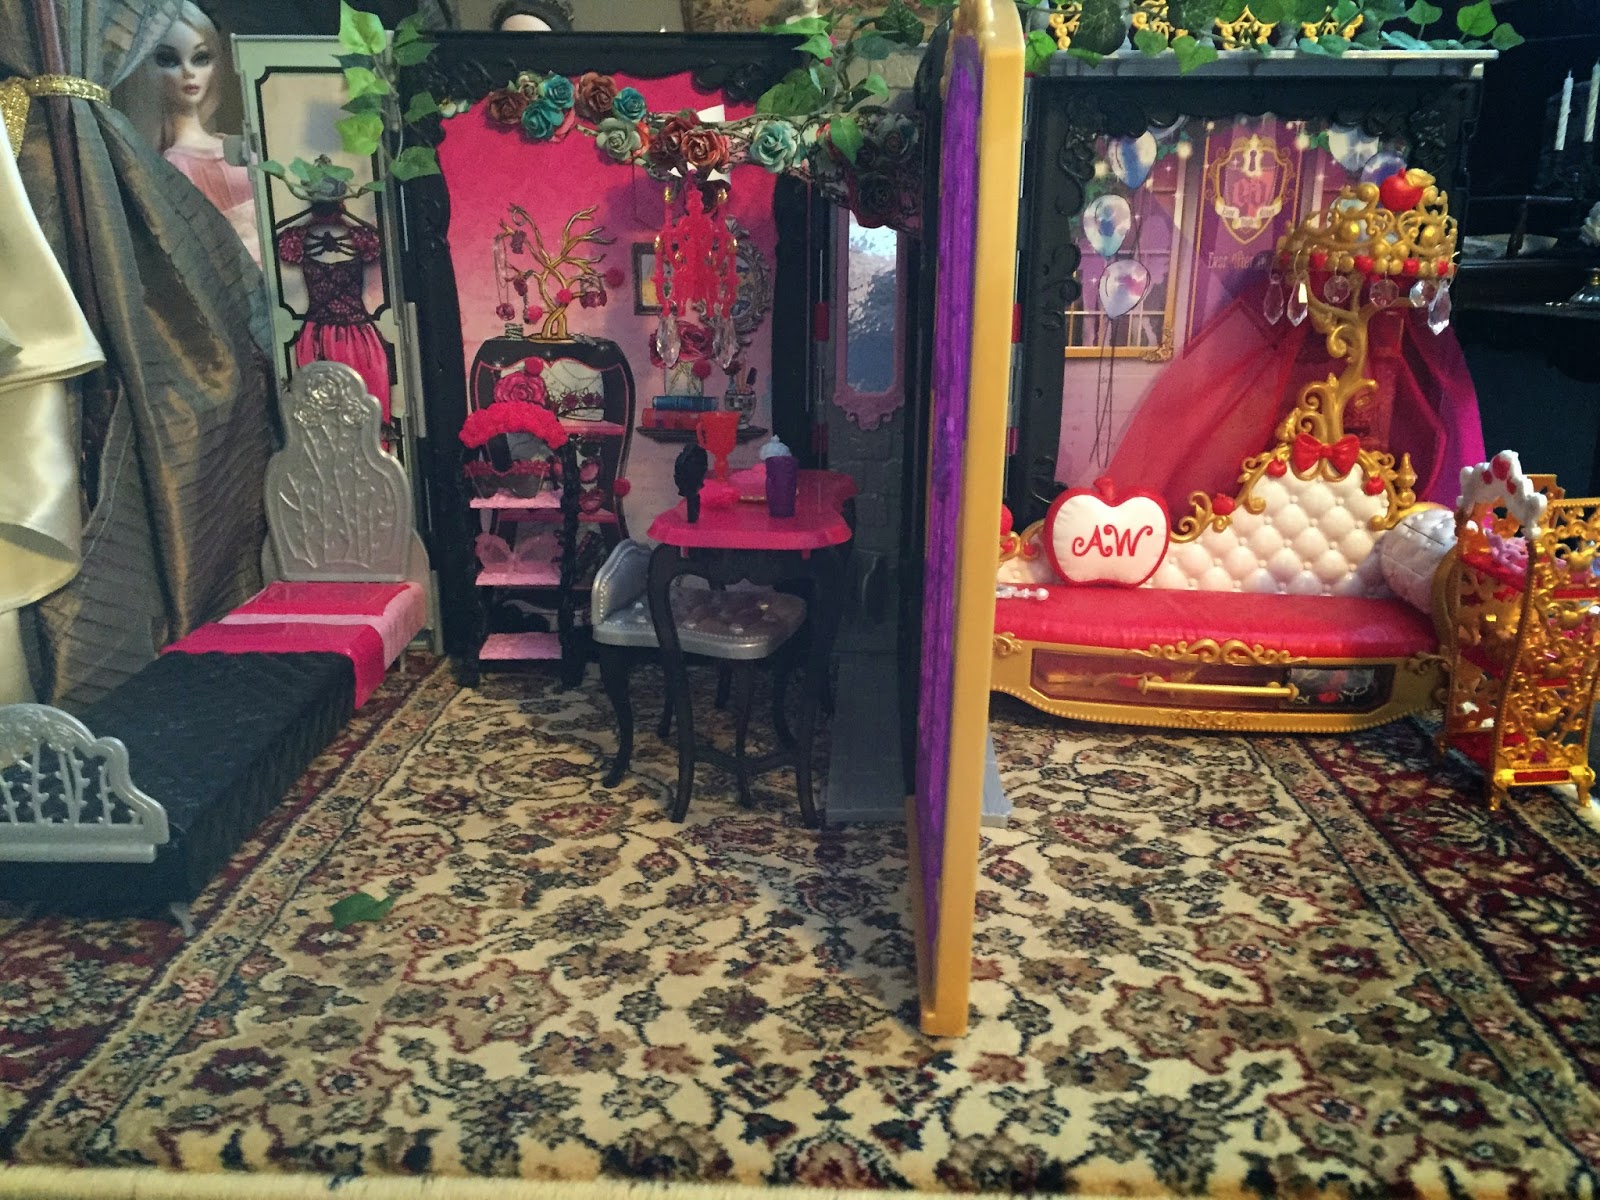
I finally got around to pimping out Briar Beauty's playset. I found some paper mache roses in the scrapbooking section of Michael's and I hot glued them to the one-dimensional roses on the background cardboard pieces. I used gold glitter glue to light the candles on her chandelier and I added some dangling crystals for effect. I cut up a fake ivy sprig from the fake flower section at Michaels and I squished them down the cracks in the wall joints so there is some added 3-dimensional effects there as well. Then I took two graduated sizes of crystals and pimped out Apple's chaise lounge and I removed the hideously fake paper DJ sound-system thingy from the right side of the playset and turned that into Apple's dorm room. Briar Beauty and Apple are my two LEAST favorite characters in the entire EAH world but for whatever reason they are the characters Mattel is pushing so we have cool stuff for them. I found the "Getting Fairest" dolls on Amazon for $11 each and their arrival, along with their little side tables, is what inspired this episode of Pimp My Playset. Pics below.
1) Briar Beauty's rather boring dorm room before pimping:
2) paper mache roses from craft store:
3) pimped out playset:
4) Apple's blinged-out chaise in her converted dorm room:
5) Finished playset with Evangeline in the background saying "could you please get this cheap plastic crap out of my bedroom?":
Friday, November 28, 2014
Saturday, May 3, 2014
Pirate Booty & Candelabras, or, how I spent my Saturday
I had a long list of things to do today, 98% of them were non-doll related tasks. Most of them went un-done because I spent the day making candelabras and pirate treasure. And doesn't that sound like more fun than washing the deck furniture and preparing the herb garden?
I am still working on my Versailles-style Salon for Anne de Legere and I have several cake top candelabras that I have been meaning to finish. These candelabras run about $10 each and can be found at many online stores, including Amazon. This is what they look like when they are new:
They have a spike on the bottom to hold them on the cake. You probably won't be able to cut it clean off but use a strong pair of scissors and it will weaken it enough that you can then snap it off. Once you have the spike off you will want to prime it with a spray primer, any color is fine. Alternatively, they do have spray paint now that bonds to plastic so you could use that. Once you have it primed you can spray it with gold spray paint. I used 24K Gold Spray Paint found at Michael's, for $4 a can. Next you need the candles. I used regular birthday candles and used an old serrated steak knife to shave off the colored diamonds:
once you get the color off them it's best to stick them into the candelabra with a dab of super glue. You could be done at this point or you can bling it up. After Christmas I found these dangly sparkly things on sale for 75 cents each. They had perfect little crystals on them so I bought a bunch of them:
I used wire cutters to remove the crystals I wanted for the candelabra. I then attached the crystals to the candelabra with a dab of superglue. In process:
You should light the candles once so they have a burned wick, it will add to the whole look. I forgot to do that and will go do it when I'm done writing this. Once I was done I put the candelabra in the salon. I have not yet constructed one of the walls so I apologize for it looking unfinished:
Then I was left with a pile of un-used crystals. I remembered an old "salesman sample trunk" that I bought on ebay:
I had intended to use it as a prop in Evangeline's attic but it was too big for her and looked out of scale. These trunks don't come cheap. I got a major deal on this one at $35 because it's in poor condition and missing the inner tray but pristine, complete, ones will run you upwards of $100. Shop around and be patient.
I got the trunk out of my attic and filled it with the extra crystals. I must have stripped at least 15 of those dangly ornament things, my hands are killing me. The trunk was the perfect size for my Iples. Queen Doria would love a trunk of pirate treasure. My Italian grandmother had half a dozen Infant of Prague dolls that she would light candles in front of. At some point the dolls went missing but the crowns were saved and I happily took them knowing they would come in useful some day. Here Doria is admiring a crown of gold and jewels brought to her from the New World by an adoring explorer. These crowns are quite expensive on the secondary market but they are truly works of art. Still I probably would never have spent the money on them but I do have these from my grandmother.
I filled the trunk with all kinds of mini treasures and am currently using the gold spray paint to spray tiny metal washers to look like gold doubloons. This will take a long time but I enjoy the process and the gradual filling of the trunk. The candelabra, by the way, is an excellent size because it can be used with 16" - 24" dolls. Here it is with the pirate treasure:
Doria is so thrilled with the haul that she has asked me to find her a pirate to go out and get her more. She has heard tell of a very sexy pirate named Leonard who always brings back a ship full of treasure. She told me that if I don't acquire him she will be most displeased. I guess the only question now is....would she prefer him to be light brown skin, or normal skin?
Saturday, January 11, 2014
Building Amelia's Fairy Garden Part 1
I know I said I would be building a salon or boudoir for Dejavu but I'm taking a detour first to build a fairy garden for Amelia. At the after-Christmas sale at a local nursery I found a terrarium that had been marked down from $70 to $14 and I knew it was time to build Amelia her garden. Here is the terrarium after I got it home and cleaned up:
It's a good scale for Amelia. Next I made a trip to Joann's and a trip to Michael's to get supplies:
The large package in the center is sheet moss. It's moss that has been dried, preserved, and then "color enhanced". I cut the sheet moss to the size needed to fit in the terrarium:
I had to leave a border in the front exposed so the doors would still shut. Next I made the tree which will be the focal point of the garden. I made the tree using a lighted branch set from Michael's:
It's very hard to see in the pic above but the package in the center is the package to the lighted branch/tree thingy ($9.99 at Michaels, bring a 40% off coupon) and the tree is poking out the bottom and not really in the picture. The tree is made of floral-tape-wrapped wires so it's easy to bend to the shape you want. Choose a fake floral spray from the floral department at Miachel's or Joann's and mesh the two together to form a lighted tree. I used green floral wire to secure the floral spray to the branches of the lighted tree form. I used the following floral spray to create my tree:
Once I made my tree, I bent the lower half of the brach into an L shape and I cut a slit down the moss mat so I could slide the tree a little ways into the terrarium with the lower part of the "L" under the mat. I secured the lower part of the "L"with hot glue to the base of the terrarium and then secured the moss mat down over it with hot glue.
I then took some wall pieces made by Department 56 for their Dicken's Christmas village:
and a bag of moss:
and I hot glued moss over the snow detail on the wall pieces because this is a spring fairy garden and not a winter scene:
I then hot glued the wall pieces in place:
next I wanted to build a flowed bed. I did this by cutting floral oasis to the shape I wanted:
I hot glued a preliminary round of moss to the top of the oasis bed. I then chose a floral spray that had tiny flowers on it and cut the flowers off and inserted them in to the oasis:
on the left in the pic above you can see the spray as it looked in Joann's and then on the right you can see the bed made up of the cut flowers. I then put the bed in the corner where I wanted it and secured it with hot glue:
Next, to finish off the bed, I hot glued small stones around the base of the oasis bed and then added more moss to cover any remaining exposed oasis and to soften the lines of the stones:
Here's are some shots of the fairy garden so far, but this is just stage one:
here's a view from the back:
I still need to make the garden gate, the tea area, more floral beds, and add in the chandelier so stay tuned for part 2!
It's a good scale for Amelia. Next I made a trip to Joann's and a trip to Michael's to get supplies:
The large package in the center is sheet moss. It's moss that has been dried, preserved, and then "color enhanced". I cut the sheet moss to the size needed to fit in the terrarium:
I had to leave a border in the front exposed so the doors would still shut. Next I made the tree which will be the focal point of the garden. I made the tree using a lighted branch set from Michael's:
It's very hard to see in the pic above but the package in the center is the package to the lighted branch/tree thingy ($9.99 at Michaels, bring a 40% off coupon) and the tree is poking out the bottom and not really in the picture. The tree is made of floral-tape-wrapped wires so it's easy to bend to the shape you want. Choose a fake floral spray from the floral department at Miachel's or Joann's and mesh the two together to form a lighted tree. I used green floral wire to secure the floral spray to the branches of the lighted tree form. I used the following floral spray to create my tree:
Once I made my tree, I bent the lower half of the brach into an L shape and I cut a slit down the moss mat so I could slide the tree a little ways into the terrarium with the lower part of the "L" under the mat. I secured the lower part of the "L"with hot glue to the base of the terrarium and then secured the moss mat down over it with hot glue.
I then took some wall pieces made by Department 56 for their Dicken's Christmas village:
and a bag of moss:
and I hot glued moss over the snow detail on the wall pieces because this is a spring fairy garden and not a winter scene:
I then hot glued the wall pieces in place:
next I wanted to build a flowed bed. I did this by cutting floral oasis to the shape I wanted:
I hot glued a preliminary round of moss to the top of the oasis bed. I then chose a floral spray that had tiny flowers on it and cut the flowers off and inserted them in to the oasis:
on the left in the pic above you can see the spray as it looked in Joann's and then on the right you can see the bed made up of the cut flowers. I then put the bed in the corner where I wanted it and secured it with hot glue:
Next, to finish off the bed, I hot glued small stones around the base of the oasis bed and then added more moss to cover any remaining exposed oasis and to soften the lines of the stones:
Here's are some shots of the fairy garden so far, but this is just stage one:
here's a view from the back:
Saturday, November 9, 2013
Finished Attic, Final Shots, and Moving On
Well, the attic extension is officially finished. I was lucky enough to have it featured in the Winter 2013 issue of Fashion Doll Quarterly! I am very excited about it and thankful to Pat Henry at FDQ for doing the spread, it looked great and she is a wonderful and kind person. Now we can leave Evangeline, to pine away for Mortimer in the solitude of her attic. Below are some final pics of the attic before moving on.
and now it's time to move on to my next project, with a new muse: Tonner's Anne de Legere!
Saturday, April 27, 2013
Building Permit
Evangeline has informed me that there is no more room in the attic. She has two lovely outfits en route and there isn't room for so much as a hat pin. She has packed her bags and is checking in to the Ipswich Grand Hotel until such time as I can provide her with an appropriate abode.
I have filed for the necessary permits:
and tomorrow begins construction on the new north wing of Evangeline's Attic! Stay tuned!
I have filed for the necessary permits:
and tomorrow begins construction on the new north wing of Evangeline's Attic! Stay tuned!
Sunday, April 21, 2013
Birthday Present For Evangeline, or, How To Hang a Tapestry
Yesterday, when Evangeline came home from work at the mortuary, she found a large parcel waiting for her. She hauled it up to her attic and opened it to find a lovely French Aubusson tapestry inside with a little note in delicate script that said, "Happy birthday Evangeline, we love you."
Clearly this treasure did not belong in the attic so Evangeline set to work hanging it in the largest and loveliest bedroom in Barkley Manor....
Well, actually, I won a pair of miniature tapestries on Ebay. I won them for $7 each. They are about 10" square and they look like they are actually meant to be sewn inside a fancy border on an accent pillow. But as it happens they are perfect scale for Evangeline:
I used these in Evangeline's library and at the time I hung them on the wall using small glue dots but I always wanted to make a proper hanging rod for them. I have recently disassembled the library and turned that space in to a larger bedroom for Evangeline so now is the perfect time for me to hang the tapestry properly. For this project I am using the tapestry on the left.
To start with I trimmed up a bamboo skewer to be slightly larger than the tapesty:
Then I whittled down the ends a bit so they would fit inside some small knobs I have that will work nicely as finials. The small knobs are by Tim Holtz and can be found at Michael's.
I then sprayed the skewer with gold spray paint. It's easiest if you stick it in a piece of styrofoam, spray paint it, let it dry, then stick the painted end in the styrofoam and spray the unpainted end, let that dry and you're ready to go:
I glued one end of the skewer into the screw hole of he knob:
I made hanging hooks out of some other doo-dads by Tim Holtz. I believe these are meant to pin small notes or ephemera on to craft projects. I used a pair of needle-nosed pliers to bend the stick pins into hooks:
In the picture above, the two hooks on the right are what they look like when you buy them at the store. The two on the left are after I bent them using the pliers. In the picture below you can see how I then used wire cutters to trim off the sharp points and used the pliers to bend the remaining piece inward to close the hook:
I threaded them on to the skewer:
and glued the other end of the skewer into the remaining knob and hung it above the fireplace in Evangeline's bedroom. Happy Birthday Evangeline!
Subscribe to:
Posts (Atom)